GETTING STARTED
Get your KrispyGauge wired up and talking to your Haltech ECU in four steps.
Orientation: Install the gauge with the line marked on the back of the unit facing upward. If your unit does not have a line, install it with the USB-C port on the left (when viewed from the screen side), which also means the 4-pin JST connector is on the left when viewed from the back.
Retaining Bracket: The included retaining bracket is designed for dashboards 5–10mm thick. If your dashboard is less than 5mm thick, fit the included spacer between the bracket and the back of the dashboard to ensure a secure, rattle-free fit.
KrispyGauge connects via a JST XH 2.54mm pitch 4-pin connector and includes a JST XH cable in the box. The cable can be used as-is to daisy-chain multiple KrispyGauges on the same CAN bus, or the open end can be chopped and terminated into a DTM connector or spliced directly into your existing loom. Connect the four wires as shown below.
| KrispyGauge Wire | Connect To |
|---|---|
| 12V (RED) | Switched 12V supply (ignition-switched) |
| GND (BLACK) | Chassis ground / ECU ground |
| CAN H (YELLOW) | Haltech CAN High |
| CAN L (GREEN) | Haltech CAN Low |
Always use an ignition-switched 12V source so the gauge powers on and off with the car. Do not connect to a permanent live battery feed.
Double-check your wiring before powering on. Reversing power polarity (12V/GND), creating a short, or accidentally applying 12V to the CAN H or CAN L pins can permanently damage the gauge and will void your warranty. Take care to verify each wire against the table above before connecting power.
120Ω Termination Resistor: A 120Ω resistor is included with your KrispyGauge. Whether you need it depends on where the gauge sits in your CAN bus network and whether your Haltech ECU has software-based termination enabled. Try without it first — only add it if you experience communication issues.
In Haltech NSP (or your Haltech tuning software), verify the CAN bus settings match KrispyGauge:
KrispyGauge is compatible with all Haltech Elite and Nexus series ECUs using the standard Haltech CAN broadcast protocol. No custom CAN streams or additional configuration are required.
With power and CAN wiring connected, KrispyGauge starts up automatically when the ignition is on:
With the gauge running, connect to its built-in WiFi hotspot to customise the gauge channel, warning thresholds, colour themes, and CAN Keypad button functions — all from any phone, tablet, or laptop.
See the Web UI Access section below for full details.
WIRELESS CONFIGURATION
Configure KrispyGauge from any device — no app required.
Turn on your vehicle's ignition. The KrispyGauge WiFi access point activates automatically on every boot — no pairing needed.
On your phone or laptop, open WiFi settings and connect to:
Krispy_XXXX
The suffix is derived from your device's unique MAC address. The full network name is shown on the gauge display at boot.
GetKrispy
Navigate to:
http://4.3.2.1
If the page doesn't load, confirm you're connected to Krispy_XXXX and that mobile data is disabled on your phone — the OS can route traffic over cellular when WiFi has no internet access.
The Web UI lets you fully customise:
FEATURE GUIDE
KrispyGauge can emulate a Haltech CAN Keypad, giving you up to 8 configurable buttons directly on your gauge touch screen — no physical keypad required.
In the KrispyGauge Web UI, navigate to the Keypad settings page. You can enable emulation of one of two keypad identities:
Once enabled, KrispyGauge will appear on the CAN bus as a native Haltech keypad of that type, and you can assign actions to each button directly within Haltech NSP.
Conflict Warning — Physical Keypad: If you already have a physical Haltech CAN Keypad connected to your vehicle, do not enable the same keypad ID on your KrispyGauge. Two devices sharing the same keypad ID on the same CAN bus will cause interference and unpredictable button behaviour.
Conflict Warning — Multiple KrispyGauges: If you are running two or more KrispyGauges on the same CAN network, do not assign the same keypad ID to more than one gauge. Each KrispyGauge must use a unique keypad identity (A or B). Emulating the same ID across multiple gauges will cause interference and unreliable operation.
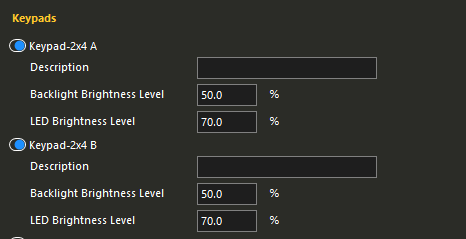
Once the KrispyGauge keypad is enabled and appearing in NSP, configure your button actions as follows:
By Configuring actions as Momentary in NSP, you pass the control of this action to the Krispy Gauge, allowing the latching function to be managed by KrispyGauge. This gives clear on/off feedback and avoids state issues with the ECU.
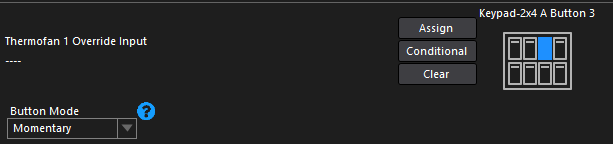
In the KrispyGauge Web UI, each keypad button can be assigned a Momentary Toggle behaviour. This mode is designed for momentary actions where you want a clear on/off state tracked on screen, such as:
Each tap sends a momentary pulse to the ECU while KrispyGauge manages the visual on/off state on screen — so you always know what's active without relying on the ECU to report back.
For functions that require a held press (e.g. scrolling through boost levels incrementally), use the standard Momentary mode — the ECU action fires for as long as the button is held on screen.
FIRMWARE
Keep your KrispyGauge current with the latest features, improvements, and bug fixes.
Release Notes
.bin file to your phone or laptop.
Krispy_XXXX WiFi and open http://4.3.2.1 in your browser.
.bin.
Keep the ignition on throughout the entire firmware update. A power interruption during flashing can corrupt firmware — use the USB Recovery method to restore a bricked unit.
TROUBLESHOOTING
If the Web UI is unreachable or the gauge is unresponsive, USB recovery can restore firmware directly.
USB recovery instructions are available on request. Get in touch at [email protected] and we'll walk you through the process.
FREQUENTLY ASKED
KrispyGauge is compatible with all Haltech Elite and Nexus series ECUs that broadcast over the Haltech CAN protocol, including:
Other Haltech models may work if they support the standard Haltech CAN broadcast — check your ECU documentation. Non-Haltech ECUs are not currently supported.
KrispyGauge is currently designed exclusively for the Haltech CAN protocol. Support for additional ECU manufacturers may be added in future firmware releases. Follow us for updates.
Work through the following checklist:
It's a good idea to back up your gauge configuration regularly — especially if you have extensive customisations, custom channels, warning thresholds, or keypad mappings set up.
http://4.3.2.1, and navigate to Advanced → Backup. Save the file to your phone or computer.Keep a copy of your backup somewhere safe — it can save a lot of time if you ever need to factory reset or recover from a failed firmware update.
A factory reset can be performed in two ways:
http://4.3.2.1, navigate to Advanced → Reset, and confirm.
All custom channels, warning thresholds, and keypad configurations will be cleared and restored to defaults.
Krispy_XXXX — not your home, Haltech, or mobile network.http:// — not https://. The Web UI does not use HTTPS.No. KrispyGauge does not join external networks — it runs its own dedicated WiFi hotspot (Krispy_XXXX) solely for configuration. To access the Web UI you must connect your phone or laptop directly to the KrispyGauge hotspot, then open http://4.3.2.1.
Home WiFi, Haltech WiFi, and other existing networks cannot be used to reach the Web UI.
KrispyGauge presents itself to your Haltech ECU as a native CAN Keypad device over the CAN bus. Configure keypad button functions in Haltech NSP exactly as you would for a physical Haltech CAN Keypad — KrispyGauge responds identically.
Up to 8 keypad buttons with custom labels can be configured via Web UI → Keypad. Tapping a button on the gauge touchscreen sends the corresponding CAN keypad command to the ECU. No separate keypad hardware is required.
KrispyGauge is designed for interior cockpit installation in a standard 52mm gauge pod. It is not waterproof and is not rated for direct water exposure. Protect the unit from high-pressure washing, water ingress, or prolonged moisture. For motorsport applications in open cockpits, use a gauge pod with a protective visor or cover.
Every KrispyGauge is individually tested on a real running Haltech Nexus R3 before it leaves the factory — so if your gauge isn't receiving CAN data, the issue is almost certainly in the installation rather than the gauge itself. Work through these checks:
If you've worked through all of the above and still have issues, contact us at [email protected].
Yes — a barebones open source community firmware is coming soon. It's designed for savvy individuals and vibe coders who want to go deeper: make key changes to the codebase, adapt the gauge to a different platform or CAN protocol, build entirely custom gauge faces, or tailor the experience exactly to their needs.
Whether you want to add support for a new ECU, rework the UI, or build something entirely new on top of the KrispyGauge hardware — the community firmware will give you the foundation to do it.
Stay tuned — more details will be announced soon. In the meantime, reach out at [email protected] if you're keen to get involved early.
Reach out via email at [email protected] or through the contact form at krispy.co.nz. Include your order number and a detailed description of your issue for the fastest response.
There are also a number of additional troubleshooting steps and methods available — get in touch and we can walk you through them.